Here are a few tips about how to cut EL Panels
Without doubt, the best tip for cutting shapes into EL Panels is have a good think about whether you really need to do it. It is very difficult to cut any fine detail and there is a big risk it isn't going to work out - so...
1) can you just use a normal panel and make a stencil to put over the panel to make the shape you need without cutting
2) we sell lots of different shaped panels - have a look to see if there is one that would work for you or even might need less cutting to get it how you want
3) if neither of those apply and you really have to get cutting then read this guide
If you are just looking to just snip the end off some EL Tape then this guide is probably a bit too much. My advice would be to use sharp scissors and remember to reseal it afterwards with superglue or clear nail varnish and just get on with it.
But if cutting EL Panels is the only way forward for you then pay close attention!
The EL Panel used in this guide is the A5 cuttable panel available in our store (but ANY EL Panel can be cut down in this way) - what makes this 'cuttable' electroluminescent sheet special is that it has a connector along each of the four edges making it very easy to cut 4 shapes that will clip straight into an EL Driver and glow
With normal EL Panels, the offcut has to be thrown away as it isnt possible to solder a new connector onto the offcut as you can with offcuts of EL Wire
CUTTING EL PANELS
This LOVE image was cut-out by a 9-year old in about 20 minutes
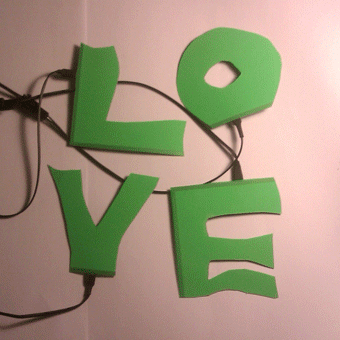
cuttable EL Tape in LOVE shape
Under my direction i tried to trick her into making every classic mistake i know of when cutting EL Panels(that might be a terrible thing to do - but i was doing it for this guide... to help YOU!!!
these were the steps we took:
1) Plan out the design on an A5 piece of paper
Try to use as much of the panel as possible and where possible, force the shapes to share cut-lines, so they are pressed right up next to each other and one cut is shared by two or more shapes
Do I need to point out that each of the 4 shapes must obviously end in a connector?
there were two mistakes my 9 year old failed to make at this point:
a) Having seen lots of EL Panels she understood the thin (3mm) electrode that runs round the edge of the panel will not light up, and took this into account when planning her design
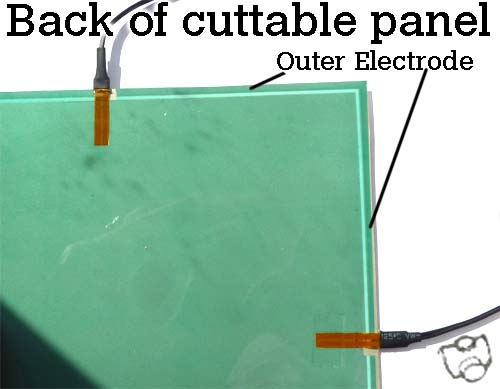
back of cuttable el panel
b) Also by fluke, or maybe she new, that you need to try and get as much of this electrode into your design as possible to make the el panel glow at its brightest.
e.g with the letter V there is only a small section of outer electrode near the connector and then the panel flares out wide - i was convinced this would mean there is not enough outer electrode on this piece to make it all glow strongly.
If the shape had been any bigger or wider (or the amount of electrode smaller) it would not glow so well at the far ends
2) Map out the design on the front of the panel
Like a lamb to the slaughter, i casually suggested she then copy out her design onto THE BACK of the EL Panel ready to be cut. If you can't immediately see what'll go wrong with this then i can't blame you, as ive made exactly the same mistake before - ONLY ONCE mind (well, twice but i don't like to admit that)
So if the image is drawn on the back, when it is cut out YOU WILL GET A REVERSE IMAGE of what you are trying to achieve - OUCH!
(fear not for the emotional sensitivity of our young maker here, since all the letters of the word LOVE will still come out right, even when they've been reversed, Love simply cannot be done wrong!)
3) Cutting out the shapes
I am usually a big fan of the scalpel for arty projects but for EL Panel it has to be sharp scissors.
Also i think its best for the panels to be a bit warm when they're cut, you get cleaner cuts. You certainly get worse cuts if the panel is freezing cold.
The EL material is sensitive to heat so don't go mad, just take the chill off it, warm it on your tummy or at most in a cloth by a radiator.
At this point, she made possibly the most ruinous mistake...
While cutting the sharp point of the V, the two scissor cuts didnt quite meet, and the shape was hanging by a thread.
With a glorious inevitability she tugged the shape free, and sure enough it caused the EL Panel nightmare -DELAMINATION

DELAMINATION!!!!!!!
ok, i admit ive peeled it apart a bit more for effect - but can you see the delam goes further than the small corner thats peeled up
when you delam, the layers of the EL Panel peel apart slightly, and this stops that part of the panel from glowing when its plugged it
in this case it was almost 1cm X 5mm triangle - it can be repaired somewhat with superglue, or even but its never as good again and its best avoided.
Happily, delaming doesn't happen too easily. I find using a scalpel can quite often delam around the cutting edge a millimetre or two.
If you are using a scalpel (which you have to for some shapes) then cut at a 60º angle; the piece of EL Panel inside the angle will be fine and the outside bit delams really heavily. These are the only 2 ways of accidentally delaming i can think of.
4) Seal the Panel
If you try to delam or peel apart the EL Panel at the cut edge - youll find its near impossible. But don't think that means it shouldn't be sealed. Over time, moisture can get in and this can cause it to peel apart.
Brushing on superglue all round the cut edge is best, or nail varnish is fine
I hope that helps and good luck with your project