Here are a few tips about how to cut EL Panels
Without doubt, the best tip for cutting shapes into EL Panels is have a good think about whether you really need to do it. It is very difficult to cut any fine detail and there is a big risk it isn't going to work out - so...
1) can you just use a normal panel and make a stencil to put over the panel to make the shape you need without cutting
2) we sell lots of different shaped panels - have a look to see if there is one that would work for you or even might need less cutting to get it how you want
3) if neither of those apply and you really have to get cutting then read this guide
If you are just looking to just snip the end off some EL Tape then this guide is probably a bit too much. My advice would be to use sharp scissors and remember to reseal it afterwards with superglue or clear nail varnish and just get on with it.
But if cutting EL Panels is the only way forward for you then pay close attention!
The EL Panel used in this guide is the A5 cuttable panel available in our store (but ANY EL Panel can be cut down in this way) - what makes this 'cuttable' electroluminescent sheet special is that it has a connector along each of the four edges making it very easy to cut 4 shapes that will clip straight into an EL Driver and glow
With normal EL Panels, the offcut has to be thrown away as it isnt possible to solder a new connector onto the offcut as you can with offcuts of EL Wire
CUTTING EL PANELS
This LOVE image was cut-out by a 9-year old in about 20 minutes
cuttable EL Tape in LOVE shape
Under my direction i tried to trick her into making every classic mistake i know of when cutting EL Panels(that might be a terrible thing to do - but i was doing it for this guide... to help YOU!!!
these were the steps we took:
1) Plan out the design on an A5 piece of paper
Try to use as much of the panel as possible and where possible, force the shapes to share cut-lines, so they are pressed right up next to each other and one cut is shared by two or more shapes
Do I need to point out that each of the 4 shapes must obviously end in a connector?
there were two mistakes my 9 year old failed to make at this point:
a) Having seen lots of EL Panels she understood the thin (3mm) electrode that runs round the edge of the panel will not light up, and took this into account when planning her design
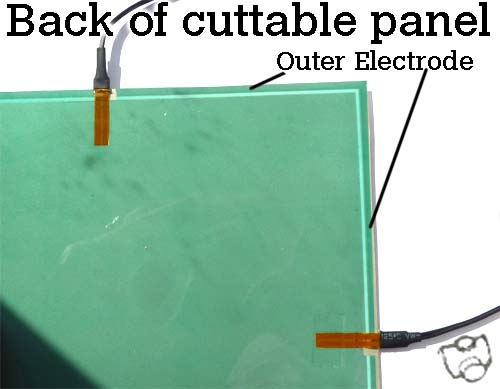
back of cuttable el panel
b) Also by fluke, or maybe she new, that you need to try and get as much of this electrode into your design as possible to make the el panel glow at its brightest.
e.g with the letter V there is only a small section of outer electrode near the connector and then the panel flares out wide - i was convinced this would mean there is not enough outer electrode on this piece to make it all glow strongly.
If the shape had been any bigger or wider (or the amount of electrode smaller) it would not glow so well at the far ends
2) Map out the design on the front of the panel
Like a lamb to the slaughter, i casually suggested she then copy out her design onto THE BACK of the EL Panel ready to be cut. If you can't immediately see what'll go wrong with this then i can't blame you, as ive made exactly the same mistake before - ONLY ONCE mind (well, twice but i don't like to admit that)
So if the image is drawn on the back, when it is cut out YOU WILL GET A REVERSE IMAGE of what you are trying to achieve - OUCH!
(fear not for the emotional sensitivity of our young maker here, since all the letters of the word LOVE will still come out right, even when they've been reversed, Love simply cannot be done wrong!)
3) Cutting out the shapes
I am usually a big fan of the scalpel for arty projects but for EL Panel it has to be sharp scissors.
Also i think its best for the panels to be a bit warm when they're cut, you get cleaner cuts. You certainly get worse cuts if the panel is freezing cold.
The EL material is sensitive to heat so don't go mad, just take the chill off it, warm it on your tummy or at most in a cloth by a radiator.
At this point, she made possibly the most ruinous mistake...
While cutting the sharp point of the V, the two scissor cuts didnt quite meet, and the shape was hanging by a thread.
With a glorious inevitability she tugged the shape free, and sure enough it caused the EL Panel nightmare -DELAMINATION

DELAMINATION!!!!!!!
ok, i admit ive peeled it apart a bit more for effect - but can you see the delam goes further than the small corner thats peeled up
when you delam, the layers of the EL Panel peel apart slightly, and this stops that part of the panel from glowing when its plugged it
in this case it was almost 1cm X 5mm triangle - it can be repaired somewhat with superglue, or even but its never as good again and its best avoided.
Happily, delaming doesn't happen too easily. I find using a scalpel can quite often delam around the cutting edge a millimetre or two.
If you are using a scalpel (which you have to for some shapes) then cut at a 60º angle; the piece of EL Panel inside the angle will be fine and the outside bit delams really heavily. These are the only 2 ways of accidentally delaming i can think of.
4) Seal the Panel
If you try to delam or peel apart the EL Panel at the cut edge - youll find its near impossible. But don't think that means it shouldn't be sealed. Over time, moisture can get in and this can cause it to peel apart.
Brushing on superglue all round the cut edge is best, or nail varnish is fine
I hope that helps and good luck with your project
Prince William and the Duchess of Cambridge have unveiled a sculpture at the heart of their new Kensington Palace Home that uses more than two miles of electroluminescent wire (EL Wire).

I had always heard that princess Kate had style, but now I'm beginning to believe it!

Wills and Kate must have some really powerful Driver to power all that EL Wire - my guess is they have 4 or 5 different Inverters powering i - and if it doesnt have an elaborate flashing sequence then the designer of this luminous lace sculpture has missed a trick
The largest EL Sculpture i have ever made was for the Glastonbury festival and by comparison was a measly 250metres of wire
If this has inspired you to make your own electroluminescent sculpture then heres a few tips:
1) Any EL Wire over 25metres or Drivers for more than 200metres would have to be ordered specially and may take a week or so to get in stock - contact me if this is your plan
2) The most powerful EL Driver I hold in stock will run 200 metres of EL Wire very brightly. With these powerful drivers, you can quite ofte control the brightness with a dial AND the flashing speed if you have it on Blink Mode
3) I always have 10m, 15m, 25metre and 100m lengths of wire in stock
4) I have powerful sequencers that can run a modest 25 metres of wire - that is 5 metres off each channel, but with the 3 different sequence modes, plus flash, and continuous ON these give an incredible effect
5) You can daisy chain as many splitters off each other as you need - i also have extenders that are 5metres long
If you are interested in a neon style light sculpture like this in your house or venue then please contact us and we can not only supply all the EL Wire and equipment you need but can give consultation on installing it too
Here’s some tips for getting the most out of your el wire:
1) Use Decent Batteries – alkaline ones like duracell are the best – but you can get these same type of batteries much cheaper (eg Maplins sell a box of 100 of them for £15)
Rechargable batteries have a lower voltage (1.2v) compared to standard batteries (1.5v)
So if you are using 8 of them in the 8XAA battery box you will be putting in 9v instead of the 12v the inverter needs
As the battery drains you will find the EL Wire becomes less bright and you may even notice it becomes patchy – this is a sign to put fresh batteries in
2) Switch Inverter Off After Use – if you unplug the wires from the inverter it will still carry on draining the batteries
3) Adding More Wire – you can ‘daisy chain’ many splitters together and have many wires coming off a single inverter. You will soon find that adding by adding extra EL wire it begins to get dimmer.
The more powerful inverters will drive the EL wire brighter (eg the 8xAA inverter runs 15m of EL wire brighter than the 2xAA inverter drives 1m of wire)
4) Any Glue Is Fine – for fixing wire to a costume. A Hot-glue gun is the best. Remember if it is being permanently fixed to clothing which is being worn out that there is some chance the wire will suffer some extreme environments so take care to observe point 5)
5) Protect The Connection Point – The inch of tubing where the power wire joins to the glowing EL Wire is BY FAR the most fragile and vulnerable point.
Lightpainters are advised to tape up and reinforce this part (as well as the wires as they come out of the inverter) before they star swinging the wire around. And if you’re using it on a costume be sure to keep this part away from elbows or anywhere it will suffer stress.
6) If The Wire Fails – It is likely to be at the place mentioned in 5) Don’t worry if the wire is firmly glued somewhere as you can just cut the connector off and re-attach it.
Instructions how to do this are on the website – unfortunately it requires wirestrippers, a soldering iron and some copper tape – but it is fairly easy. Sometimes though it is the fault of the very far end of the EL wire, perhaps the end cap has fallen off and something has shorted thewires at that end so give it a quick rub and see if it sparks into life ( you yourself might get a tingle of an electro shock off this - dont worry though, EL Wire is VERY low current so there is no danger of a painful shock
Hi any questions you have about EL Wire will be answered here but heres a bit of info about it :
EL Wire is very bright glowing wire that comes in all colours and can be between 1.3mm and 8mm thick
the standard sizes are 1.3mm 'angel hair', 2.3mm, 3.2mm, 5mm and sometimes 8mm
It needs batteries or some way to power it (mains or USB) and then a driver/inverter to make it glow

EL Wire has a copper wire in its core - this is then painted with 'Electro-Luminescent' paint
This EL paint is very similar to glow-in-the-dark paint except EL paint glows when it is exposed to an electric field
Surrounding this copper wire that has EL paint around it are two VERY thin wires
These thin wires attach to the positive coming from the driver/inverter and the central copper wire will be wired up to the negative
(because it is an Alternating Current coming from the inverter it doesnt actually make a difference if its wired to the positive or negative)
The copper core, EL Paint and thin electrtical wires are held inside a clear protective plastic tube which can then be coated with coloured tubing to change the colour of the glow
EL wire design is a very similar same setup as coaxial cable and i always think its weird that the copper wire and the thin electrical wires don't ever meet or touch and no circuit is made between them - in fact if it does then the wire will fail at this point
So the glow isn't made by a current running through and making a curcuit lighting up the wire (like in an LED) but because the copper wire and the thin electrical wires are holding a charge like a capacitor
This is why EL Wire is so energy efficient and it is only the efficiency of the inverter that will cause any power drain - so remember to use decent inverters!
The Electro-Luminescent paint likes a voltage of around 100V to glow (and a frequency of 500 - 1000Htz)
most power inputs are 3v (2 X AA batteries) or 12V so the driver has to 'invert' the voltage up to 100V
The EL Paint glows a light blue colour and any other colour has to be made by putting different coloured plastic tubing round it.
Red is the hardest colour to make from the blue so turns out to be a lot less bright than the blue
Well i hope that helps with finding out how all this works - please leave any comments or questions
INVERTERS:
12v (5-15metres):
6cm X 4cm X 3cm
Sound Activated:
6cm X 5cm X 3cm
Power Pack:
63mm X 58mm X 30mm